I know that’s for many Jeep owners it’s a piece of cake. Also it’s nothing you do every day. Probably most of you will never do it in theirs but it happened to me on Saturday – my engine started chirping. I looked and listened to the engine and (with help from the Jeep Forum guys) narrowed causes down to ignition distributor and/or oil pump. I decided to start with the distributor (lately if turned out to be good decision). Here is small how-to.
Removal
1. Tools
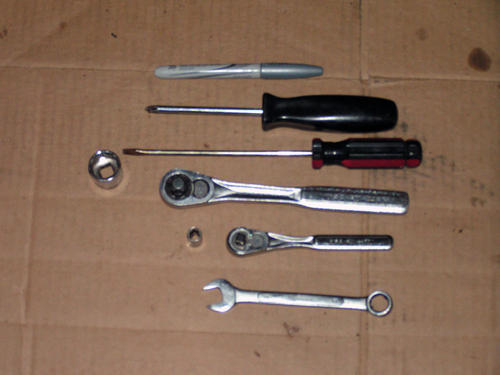
All you need is on the picture:
- flat screwdriver
- philips screwdriver
- 13mm wrench
- 19mm socket and ratchet
- 8mm socket
- Sharpie marker
After you have all tools we can start the job
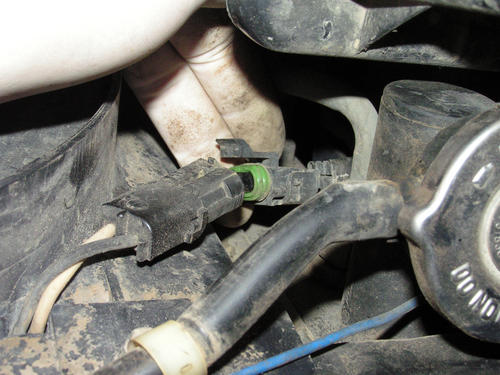
2. Remove auxiliary electric fan
This step is only necessary when procedure is done on the Cherokee (XJ) model – this is the only way to turn the crankshaft vibration damper. In Grand Cherokee (ZJ) you have access to this bolt from underneath. Now disconnect the battery negative cable, then disconnect the radiator fan electric connector:
Then unscrew (using 8mm socket) two bolts which are also mounting points for coolant reservoir pipe:
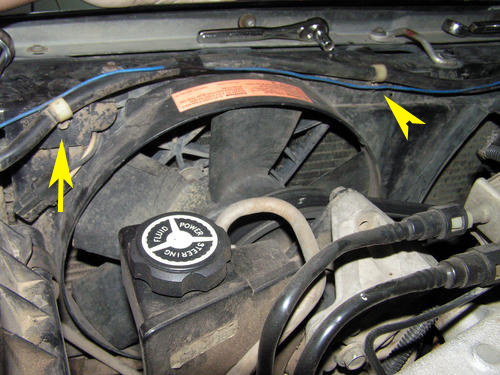
And remove it simply pulling it up.
3. Remove distributor cap
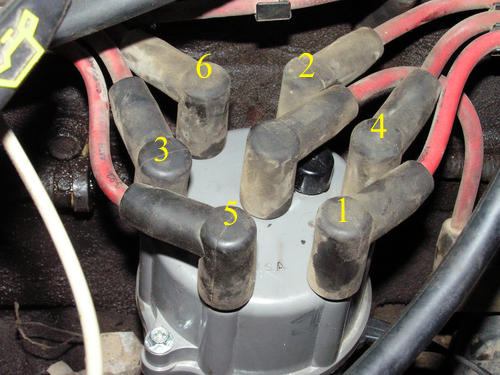
But before you do this there are two things to be done. First – write down somewhere numbers to which cylinder which wire goes. Unfortunately there is no such info on any distributor caps I have seen. You can also print this picture:
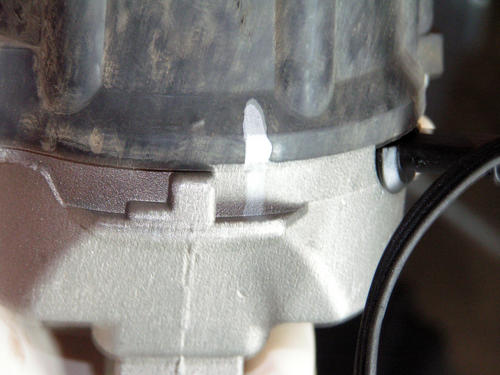
Then make a mark both on the distributor and the cap just next to the cylinder number one terminal:
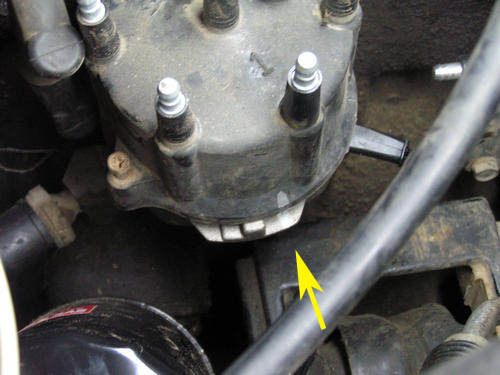
Now, using philips screwdriver, unbolt and remove distributor cap.
4. Set crankshaft in correct position
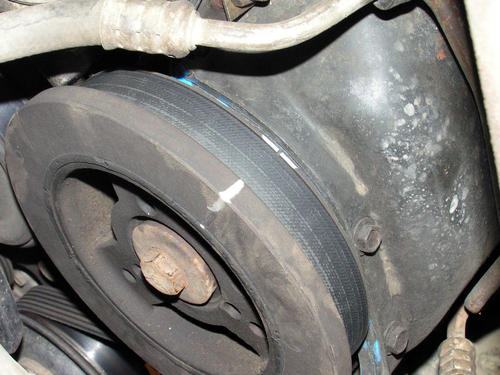
Now lie under the car and turning the crankshaft vibration dumper clockwise (!) find the notch on it and mark it with sharpie – it will make our job a little easier:
Then, this time from the top, rotate it clockwise until that notch will be aligned with 0 degree mark:
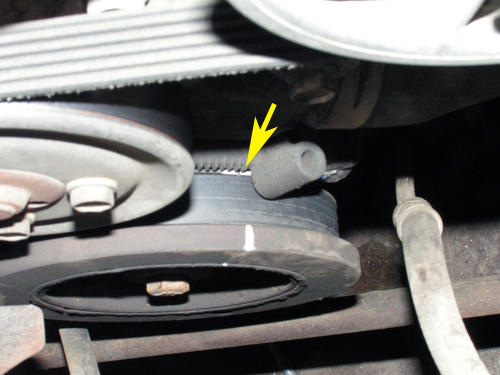
Now the rotor should be aligned with the mark we did before:

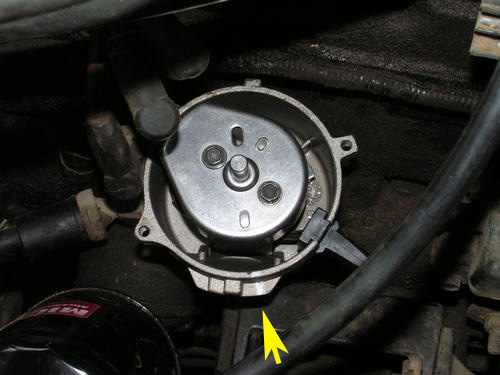
5. Remove the distributor
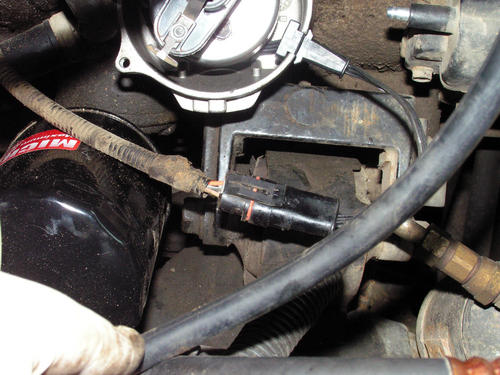
Now take out the rotor. Then disconnect distributor’s connector
Now using 13mm wrench unbolt distributor from engine block:
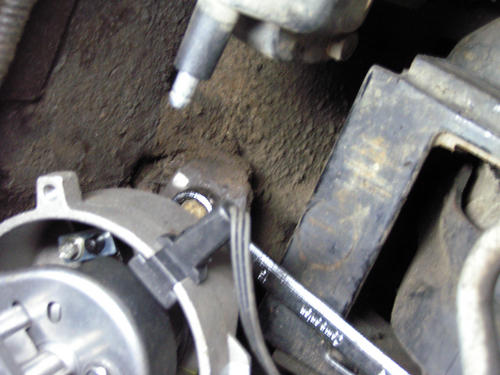
and pull it out from the engine.
Installation
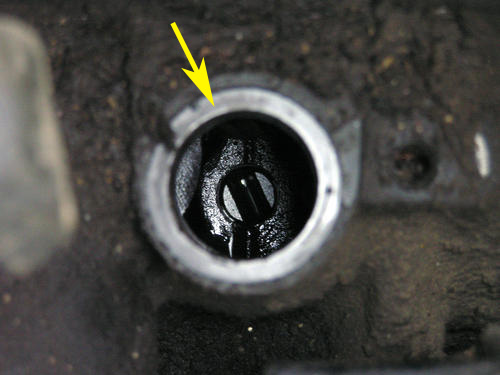
6. Set oil pump
Before inserting new distributor in it’s place you need to make some alignment. First, using flat screwdriver, set the oil pump shaft around 11 o’clock position:
7. New distributor preparation
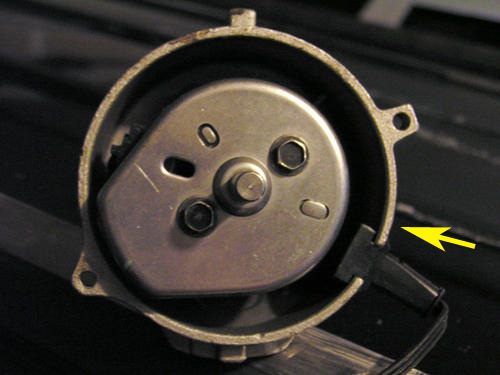
Then take the new distributor, put the old cap on it and mark the distributor next to the number one cylinder terminal as you did with the old one.
Then set distributor’s shaft in a way that rotor’s line should point on 4 o’clock.
8. Insert new distributor
Remembering about distributor gasket insert new distributor carefully into the engine’s block keeping distributor’s hold down ear aligned with bolt hole in the engine. During the insertion process the distributor shaft should rotate a little bit. At the and it should point exactly at the mark we made before.
If it points in other direction you have to pull it out again and change the initial position to achieve the final one. Then bolt it down to the engine’s block.
9. Rotor, cap, connections
Now install the rotor, then the cap and distributor connector. Then using previously made notes correctly connect all ignition cables.
10. Fan
Reinstall the auxiliary fan and connect negative battery cable. Start engine. Take a beer.
Technorati Tags: Jeep, Cherokee, XJ, Grand Cherokee, ZJ, distributor, rotor, cap
Hey great pic’s!
I did all the above but have a hard start and rough running over 2,000 rpm. Seems to be running advanced. 93 Jeep so no timing marks. It ran for a spell w/o the oil pump engaged as the dist. tang broke off and the distributor walked up and out of the block but was still running! No apparent damage just not starting or running smooth. Any suggestions? The rotor is only showing wear now on the front 1/3 of the rotor.
Steve
Although pictures taken above show ’92 Cherokee I did exactly the same thing on my ’93 Grand and timings marks definitely are there. From what you describe it can be numerous things – messed up spark plug wires? everything off one tooth? What I would suggest is to carefully redo whole thing to make sure you’ve got everything right.
Tomasz hi – why do you mark NEXT TO dizzy-cap no.1 position, rather than directly under it?
Your instructions seeare good and I’ve followd them, but my engine will not fire properly after fitting new distrib. Tried re-aligning distrib twice more, but it seems perfect. Used TDC guage in place of cylinder 1 spark plug as crank seems to have 2 timing marks on it. Not really sure what to do…
If you look at the very next picture you’ll notice that the position next to n. 1 cap terminal happens to be a position of the distributor finger when the engine is in TDC on 1st cylinder. This way whole job is easier.
Main principle (I apparently did not stress it strong enough in the text) is to put everything back together exactly as it was before. Putting mark is there to help you put finger in exactly the same position it was when you were taking old distributor out. Exact position (withing couple of degrees) is not that important as the finger can be only inserted in certain positions, but again – it has to be in exactly the same position it was when you took it out.
In my case I had to remove the distributor and rotate it’s shaft one one tooth more to get the finger aligned. I did it on my both Jeeps and both of them run great (well, at least not worse than before changing the distributors).
Dammmmmmmmm!!! im tired of this!! I followed EVERYTHING!! And no! it doesnt start.. i have a Jeep Cherokee 1995 4.0 high output… Can anyone help me?! well i did mess up at first because i just took out the old distributor and didnt mark anything.. so can anyone help?! please come one!! email me.. please! drummer2780@yahoo.com
Im the same guy from the top.. help me out here.. ill always check this website out.. thanks…
Hugh thanks!!
Not knowing what I was doing I took the old dist out without marking it or the wires…..
This publication showed me the right way to fix the problem….my 99 TJ popped off and ran like a Swiss watch.
Michael
Just wanted to say thats for a great write up. I was having issues with my 97 TJ and this showed me how to do it perfect! thanks again!
Thanks soooo much for the info.. It was very easy to follow, continue to make these service bulletins!!!!
Thank you. I recently bought a 1998 XJ Cherokee that had a slight miss. I took a gamble when I got it, but I didnt think it would be too much of a project. Replaced the cap, rotor, plugs, wires, TPS, I was going to start replacing MAP, IAC, and so on. After reading your post, I went to the garage and started pulling off the distributer cap and positioning the crank at TDC. Sure enough, the rotor was pointing at 3 oclock, completely missing #1 post on the distributer cap. Using your instructions, I reset the distributer in the correct position and it runs like a top. Thanks for spreading your wealth bud. You can find an answer for everything on the internet these days.
brother. i appreciate your tip, i redid the process three times. first one followed your tip to the footprint. lol failed… second time i left it at 8 degrees failed the third time i left the time at 4 degrees BTD started and ran like a champ. thank you lots… it still has an intermittent spin no star issue. but seems like a lack of KPC signal… any suggestion?
Good expl! Just one comment. There are TWO TDCs . One needs to ensure engine is at TDC on the COMPRESSION STROKE. To do this feel for compression on cylinder 1(=cyl nearest radiator) as engine moves towards TDC. If u install rotor on the non compression it will be 180deg off and will not fire
Im in the soup with this on a “96” grand cherokee 4.0L. I was trying to get spark and had to replace computer. I moved the distributor to prove it had spark now but a baggy chain. replaced chain and now unsure how rotor aligns because i had done one years ago. At that time I was instructed to align with cam sensor. Because its a newer model in the parts usage, having an empty distributor that has a flat plastic cam sensor plate. When you lift it, it reveals a white plastic hall effect interrupter plate that is equipped with a slice of beer can that makes a vertical semicircle. so Q: since new style engines align with location of cam sensor when installed,(chilton) Is this one more like them? or the ones made like your pics???? they have the same distributor housing but no metal centerpiece cap. The thing about it is that the plugs fuel foul when the spark is out of range even a little.
Are you ending with your rotor pointing at 4 o’clock when at tdc compression? or pointed at your homemade mark? it seems you are saying that’s where it was, the paint mark, when you set to 0 degrees and were on compression stroke (both valves closed) but went back and “corrected the info” with a clean distributor and highlighted the pic with the arrow at 4 oclock. thats just counter clockwise of the gap which your wire passes through and uses for a locator. On the one i have here, the cam sensor uses a similar gap to pass the sensor wiring through. So i am asking, what new data do we know from having read this???? theres still 2 possible places for the 0 degree compression stroke location of the rotor the way this reads.. I shall try the 4 oclock idea and see if it fouls the plugs because your unexplained homemade indication would be after passing the #1 tower in the cap. the dilemma is the 4 oclock idea is way before the #1 tower in the cap. and i wonder what part is called the finger???? we are left to guess you mean the rotor points there??? the chilton book has pics but of what car what year what engine is infinitely debateable
your last pic should be with the rotor installed, the distributor sank into the engine and the locator holding it (distributor housing) from rotating. then the engine set to compression stroke, and the damper turned to 0 degrees. we need to see where the rotor points in relationship to #1 cylinder in the cap. then please tell me why its different than other engines. its really far before cyl 1 in rotation. there are many many updates to the jeep book. they have them available at library. unfortunately distributor diagram is far from legible or sensical and has not been updated
i think kevins perspective of 3 oclock is based on where his head is turned. wouldnt he be a tooth off? or is this an indication of variation caused by loose timing chain? he says he had a miss. my jeep was peviously not starting at 3 oclock with a new chain
You sir are the only source that was easily understandable with tdc. Jeep runs flawlessly now Thank you very much.
Man, all I can say is thank you for a very well written walk through. I finished this little project in about an hour, and the old ZJ runs great. Awesome job, and again, thank you.
End
THE DISTRIBUTOR ON THE 96 JEEP 4.0 IS VERY COMPLICATED FIRST THE ENGINE NEEDS TO BE ON COMPRESSION STROKE THAT IS YOUR FIRING STROKE . BEFORE INSTALLING YOUR DISTRIBUTOR REMOVE YOUR CAM SENSOR . AT THE BASE OF YOUR DISTRIBUTOR THERE IS A WHITE PLASTIC PLATE THAT HAS FOUR HOLES. POSITION YOUR DISTRIBUTOR IN THE ONE O,CLOCK POSITION PLACE A SCREW THROUGH THE PLASTIC HOLE &THE BODY OF THE DISTRIBUTOR YOUR OIL PUMP SHAFT SHOULD BE IN THE 11 O-CLOCK POSITION . NOW INSERT YOUR DISTRIBUTOR THEN YOUR HOLD DOWN BOLT. REMOVE YOUR SCREWDRIVER REPLACE YOUR CAM SENSOR THEN YOUR DISTRIBUTOR ROTOR. AT THIS TIME YOUR DISTRIBUTOR SHOULD POINT IN THE 5-O CLOCK POSITION . NOW REPLACE YOUR DISTRIBUTOR CAP MAKE SURE YOUR FIRING ORDER IS CORRECT IT WILL START DO NOT WORRY ABOUT THE #1 ON THE DISTRIBUTOR COP THIS IS A WEIRD SETUP.
awesome write up!!! my timing is spot on. and my check engine light went off showing a camshaft sensor problem. still have very slight backfire problem…but gonna replace the O2 sensors…probably that.
only problem I had was the dam distrib clamp snapped off!!! PITA!!! had to go get new dist at orielly’s $50. it needed new one anyway….cause bearings were starting to go.
hey question…did anyone ever install those high performance ones with the cam and crank sensor on the distributor???
Very nice wright up and pictures. Thanks for sharing with us.
Hello,
I’m looking at buying a used 97 Jeep from someone who tried replacing the distributor, but they did NOT mark anything first! Can you tell me how to put the new distributor in without knowing how it was before? thanks!
what if you do it wrong the first time an mess up the timing how do you fix it?
The only thing you can do is start the whole process from scratch, find the TDC point and go from there. I had to do mine twice and it worked the second time like a charm.
I’ve got a 96 Jeep Grand Cherokee that I recently installed a new distributor in. After it was done it had a horrific rough idle like a drag car and when I shut it off and tried to turn it back on it wouldn’t turn over and eventually made a weird grinding noise as if the car was on and I turned the ignition again. I was already having the mysterious dying jeep thing going on with it and constantly getting a p 0351 “primary ignition/ secondary ignition malfunction” code. My ignition coil is brand new and has been tested good already so I figured the distributor was the problem, but now that I have it in this new problem has started. The only thing that I noticed different per the instructions is that my rotor did not face at five o’clock but more towards 6 o’clockafter installation , could this be the problem? I am at my wits end and not sure what to do.
Without seeing it I can’t give you any more detailed advice other than start again, make sure you have every mark aligned properly, that your piston is in fact in TDC on compression stroke (not on exhaust) etc. I had to redo mine because I wasn’t careful enough the first time.
well I managed to find top dead center but even though I did that the distributor still doesn’t line up right. The rotor is still pointing at 6 o’clock rather than between 5 and 6 o’clock as explained. Somebody here explained it just for the 96 to turn the distributor in the 1 o’clock position. What part of the distributor do you turn to the 1 o’clock position? I don’t understand what you mean. Racking my brain here! The old distributor rotor pointed at 5 o’clock and this one won’t. the white piece that spins in the inside has two holes that will line up with a hole in the body of the distributor which one am I supposed to put a screw through when setting it in?
okay so I left a comment got no response. This distributor rotor does not line up at the 5 o’clock position after it is installed. I do have piston 1 at top dead center and yet the road or still points at six. My car kind of turns over and then makes a loud grinding noise. What the heck is wrong with this vehicle?!
I have a 1997 Jeep TJ Sahara 4.0 auto trans. I pulled trans trans/ transfer case out to replace front pump, did not mark flywheel and torque converter, crankshaft positioning sensor located in bellhousing. Reinstalled everything Jeep will not crank, just spins.How do you reset or correct problem? Thanks
Tom thank you so much for so clear and effective explanation, did all the steps like you posted and my 89 Cherokee XJ fired up with no problem thanks bro.
wonderful write ups guys thank you very much. i had a stalemate yesterday with this same 95 jeep trying to correct the timing that the electrician had messed up. i could not recall how its set and all your old notes(not so old i guess coz they remain relevant as long as the jeeps are around kkkkkkkk) have been of immense help. this is wealth. again thanks